BitLocker is a free encryption feature in Windows that comes standard on most versions of the OS and allows for the encryption of drives on the system, as a layer of security. With traditionally unencrypted disks (the vast majority of the world’s computers), attackers could extract all of the data available on the local disk. This can be done by simply docking the system’s HDD onto another computer to browse the file system or by running a live distro of Linux\WinPE where the data would be in clear text. Not only is the local data on an unencrypted disk at risk, but other sensitive data like password hashes could also be recovered and used for other malicious purposes.
Therefore, drive encryption is an integral part of good security.
The problem with enabling BitLocker, or any other security feature, is that it poses a significant burden on administrators in terms of: manageability, reliability and required knowledge.
Goal
In order to ease the manageability effort required by BitLocker, we want to leverage a traditional System Management platform, such as System Center Configuration Manager, as well as the IDaaS (Identity as a service) feature offered by Azure Active Directory and the automation capabilities provided by Azure Automation, so as to allow the end-user to recover the BitLocker key protector by accessing the myapps.microsoft.com portal.
Note that in this article, only TPM recovery key is covered, meaning that only the OS volume is managed, without PIN codes to remember, no usb key required at logon, 100% transparent as far as users are concerned!
With all of that said, this form of implementation is not the most secure available, since, for example, it won’t allow for multi-factor authentication. Instead, the goal is to provide “better than nothing” encryption, which is far superior to leaving the disks in clear text.
Basic Concepts
Before moving further, there are a few terms you need to be familiar with:
TPM
The “Trusted Protection Module” is a microchip that comes built-into most laptops and desktops ordered today. It provides a way of creating and encrypting keys that could be used for BitLocker and for other security related features. With TPM & BitLocker, the system would automatically decrypt the PC on startup, without requiring the use of a pin, usb, or other form of authentication
FVEK
The “Full Volume Encryption Key” is a key used by BitLocker to encrypt the entire C: drive. The FVEK is stored in metadata which itself is encrypt by the VMK, explained below
VMK
The “Volume Master Key” unlocks the FVEK, which in turn decrypts the C: drive. This is automatically generated and managed by BitLocker
The VMK itself is further encrypted by “Key Protectors”. Knowledge of the VMK and FVEK is not necessary for BitLocker implementation, but knowledge of the key protectors is required
Key Protectors
A key protector is yet another key that protects the VMK, which in turn protects the FVEK, which in turn protects the data. The key protector comes in many forms:
- A USB drive could be configured as a so-called “key protector”. When this is done, that flash drive must be plugged into the pc at boot up in order to unlock the drive and boot the system.
- A passcode (whether short or long, numerical, alphabetical, or alphanumerical) could be used as a protector. When this is in place as a key protector, the end user must supply the passcode at each boot.
- A Recovery Key can be created and stored in Active Directory and\or in Azure Active Directory. This is a must, for data recovery in an emergency. [This is needed]
- Finally, the TPM may be used to protect the FVEK. When this is used, no information is required on the part of the user. The system automatically decrypts the drive at boot up. [This is needed]
Azure Active Directory
Azure Active Directory (AAD) is a comprehensive identity and access management cloud solution that provides a robust set of capabilities to manage users and groups. It helps secure access to on-premises and cloud applications. Azure AD comes in three editions: Free, Basic, and Premium. For this scenario, AAD Premium is needed.
Azure AD Connect
Azure AD Connect is a service which is aimed to keep the association between the computer and user accounts in your on-premises Active Directory (AD) and the device and user objects in Azure AD. In this way, users can use a single identity to access on-premises applications and cloud services. It also enables other device related features like Windows Hello for Business. More on this can be found here.
Let’s do a quick recap: what we want to do is to protect computers’ OS volume with the use of BitLocker, leveraging the TMP chip to save the encryption key. Then we want to create a Recovery Key and upload it to AAD, allowing the users to retrieve it independently, in case of need.
How to get there...
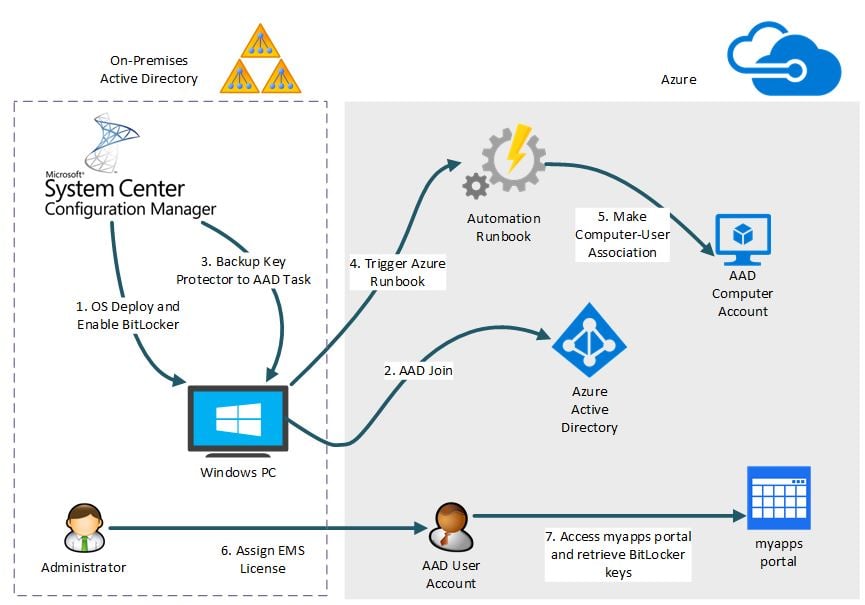
One possible solution to achieve our goal is depicted below.

The entire workflow can be broken down into the following high-level steps:
- Enable BitLocker for the OS volume on computers
- Manage computers in Azure
- Upload the BitLocker Recovery key to Azure AD
- Trigger the Azure Automation Runbook
- Make the Computer-User association
- Assign users the needed EMS license
- User can browse the myapps.microsoft.com to recover BitLocker keys
Let’s dig into more details of each of the steps outlined.
1. Enabling BitLocker: System Center Configuration Manager
Here the preferred solution to enable and configure BitLocker protection is System Center Configuration Manager (SCCM). We can use an OS deployment task sequence to enable BitLocker straight from the PC installation or we can enable it later, by running a script or another task sequence containing the “Enable BitLocker” task.
Here how this step looks like in a SCCM task sequence; note that this operation can also create a Recovery Key and save it to Active Directory (on-premises).

2. Managing Computers and Users Account in Azure AD
We assume that Azure AD Connect is in place and running, so that AD user and computer accounts are kept in sync with the corresponding AAD user and device objects. This type of device registration is known as hybrid AAD join (refer to https://docs.microsoft.com/en-us/azure/active-directory/device-management-hybrid-azuread-joined-devices-setup ). On the Azure portal, in the AAD service blade, the devices listed must have the “Join Type” column value as shown below:

Although not tested, also other types of AAD join, such as “Azure AD joined” or “Azure AD registered”, should be ok. For more information on the available kind of device registration in AAD, refer to https://docs.microsoft.com/en-us/azure/active-directory/device-management-introduction .
3. Upload the Recovery Key to Azure AD
By means of a script, we need to carry out the following tasks:
- check if the computer is registered in AAD
- check if the OS volume is already protected with BitLocker
- check if a recovery key protector already exists and if not, create it
- backup the recovery key to AAD
The script can be deployed by any means, the only thing MANDATORY is that it must be executed with local admin privileges. We accomplished that by leveraging (again!) SCCM, which runs the script in the SYSTEM context.
The full script is provided at the end of this post. enableSSRP_client.ps1
4. Trigger the Azure Automation Runbook
The idea is to start a (previously deployed) Azure runbook, passing as a parameter the name of the primary user (or users) of the PC. Now, the concept of “Primary User” comes from SCCM, and we leveraged the User Device Affinity (UDA) in SCCM in order to know who the primary users are. How UDA works is out of scope and can be examined here.
Primary users can be retrieved from the local SCCM agent with a WMI query; here a PowerShell sample:

Once we have the information about the primary user, we can trigger the Azure runbook (more on this in the next chapter) with a REST invocation. The following example uses the Invoke-RestMethod PS cmdlet:

5. User – Computer Account Association
This is the tricky part! We opted for a PowerShell Azure runbook, webhook enabled (read here for more details), where we carry out these actions:
- check if user and device exist in AAD (if not, abort)
- check if user is already registered with the device (if yes, abort)
- register the user with the device
All the actions above make use of the AzureAD PowerShell module, version 2.0.0.131 or later, which must be made available under Shared Resources\Modules.
Important note: credentials of an account with AAD global administrator role are required.

When creating the webhook, you are asked for a date of expiration: THIS IS IMPORTANT, since the alphanumeric token associated to the webhook URL will remain valid until the date you specify here!

The webhook-enabled runbook accepts one single parameter, WEBHOOKDATA, which is automatically created:

The webhook URL will look like this one:
https://s2events.azure-automation.net/webhooks?token=xQYlErIDSFy6OfQPIJfbyK9bmeeRRM9quflbqpveVc7c%3d
The highlighted section is the security token that must be used as input parameter of the script described at step 3.
Important note: after creating a webhook, its URL cannot be viewed, so write it down NOW!
You can find the runbook code at the end of this post. enableSSRP_runbook.ps1
6. Enterprise Mobility + Security License
At this point, if a user logs in with his\her work credentials into https://myapps.microsoft.com and goes to the “Profile” page, he\she likely cannot see any device, although the association with his\her device completed successfully. This is because a last piece is missing, which is the EMS license. The minimum level of license required is somewhat unknown, since we got no definitive answer from Microsoft Support. From our tests, either an “Intune A Direct” or “Azure Active Directory Premium Plan 1”, both available in EMS E3 plan, will do the trick (it might take some time to apply, so be patient!):

7. Retrieve the BitLocker Recovery Key
In the end, a user can browse to https://myapps.microsoft.com, go to the “Profile” page and see all the registered devices:

Clicking on “Get BitLocker keys”, the recovery key can be retrieved, in case of need.

Wrapping it all up....
Protecting data by encrypting the computer disk is a good practice when security is a concern. However, managing a large number of BitLocker-enabled computers can pose a significant load on administrators, especially when it comes to support end users after an event that might trigger BitLocker recovery mode on the OS volume, such as a Bios setting change or a Bios update. Thus, the possibility for the users to independently recover from such a situation can be of great interest to the IT department.
Credits
We want to say thanks to: Adam, for this great post, which explained a lot, Pieter Wigleven for the code to back up the recovery key to AAD and Stefan Stranger for explaining how to start an Azure runbook with a webhook
Downloads
Do you want more information about this? Contact us!